Check your hives for varroa mite
Help slow the spread
Varroa mite (Varroa destructor) is now classified as category 2 restricted matter. It remains notifiable and all beekeepers must report, control or contain the pest.
Varroa destructor with resistance to synthetic miticide treatments (including synthetic pyrethroids Bayvarol and Apistan and synthetic formamidine Amitraz, Apivar and Apitraz) has been detected in South East Queensland.
Help slow the spread of varroa mite in Queensland:
- Limit the movement of hives, swarms and nucs to reduce risks of spread.
- Avoid bringing swarms into your apiaries until they have been treated and a negative wash has been undertaken.
- Monitor your hives every month and before, during and after treatments to ensure effectiveness.
- Maintain hive health using an integrated pest management plan.
- Do not always use the same miticide—rotate different chemicals. Always follow the instructions on the chemical’s label or permit.
- Report hive checks using the Bee 123 form.
- Come clean go clean, especially between apiaries.
- Use the varroa mite surveillance map to inform your decision.
Whether you're a commercial beekeeper or an enthusiast with one hive in your backyard, it's important to regularly check your hives for varroa mite (Varroa destructor, Varroa jacobsoni). Report all hive checks using the Bee 123 form, even if you do not find mites.
Doing this will:
- protect your hives and the honey bee industry from varroa mite
- help to slow the spread of this pest.
When to test
- Monitor multiple hives monthly to ensure early detection and determine mite load/threshold levels.
- Monitor hives once treatment is removed to ensure it has worked.
- Complete a pre-departure hive test if you plan to move hives to another location or as part of your permit requirements.
- Complete a post-departure hive test after moving hives to a new location.
How to test
There are 5 ways to check your hives for the presence or absence of varroa mite:
- alcohol wash (recommended method) using a shake jar with either
- a mesh or drilled-hole lid
- or
- an internal basket
- drone brood uncapping
- sugar shake
- sticky mats
- soapy water wash.
To determine the number of mites per 300 bees (mite loading or threshold level), use:
- an alcohol wash (recommended method) with either type of shake jar
or - a sugar shake.
-
This is an effective method of detecting mites in your hive. However, it will not detect varroa mite in capped brood cells.
Watch our short video on how to check hives using an alcohol wash.
Tips
- This test kills the bees sampled, so first find and exclude the queen bee.
- Using filter paper or cloth to strain the liquid allows mites to be easily detected as they will remain on the paper or cloth.
- If the sample does not contain mites, you can reuse the alcohol to test other hives.
- Alcohol is a potential fire hazard, so always keep it away from the smoker.
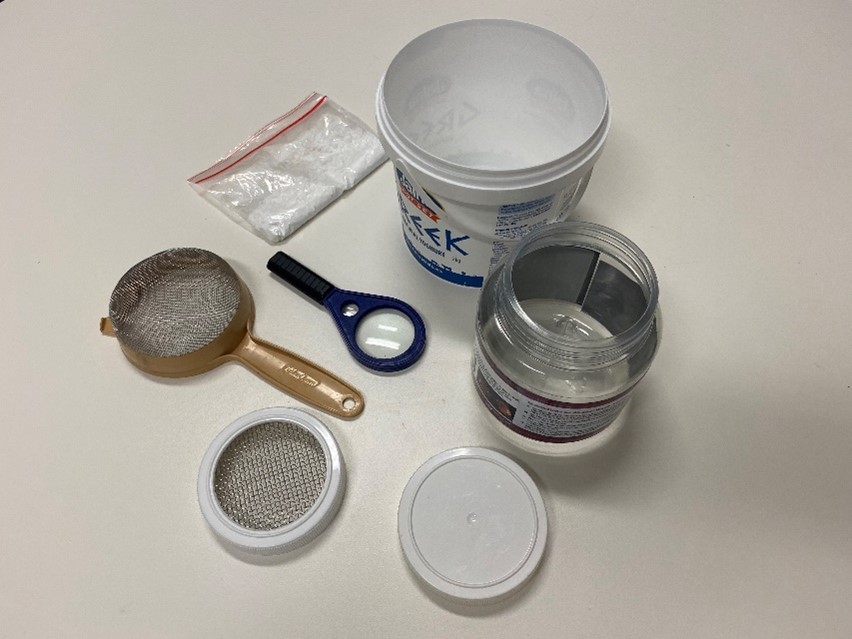
Materials
- PPE (protective clothing, smoker and hive tool)
- A shake jar with a mesh (or drilled-hole) lid and a solid lid
- Alcohol: either pure methylated spirits (preferably clear) or more than 70% concentrated ethanol
- A tub to shake bees into for collection
- A container for collecting used alcohol
- A magnifying glass (optional)
- A filter (such as a coffee filter or fine cloth)
- A small funnel to support the filter paper or cloth
- A container for collecting the strained liquid
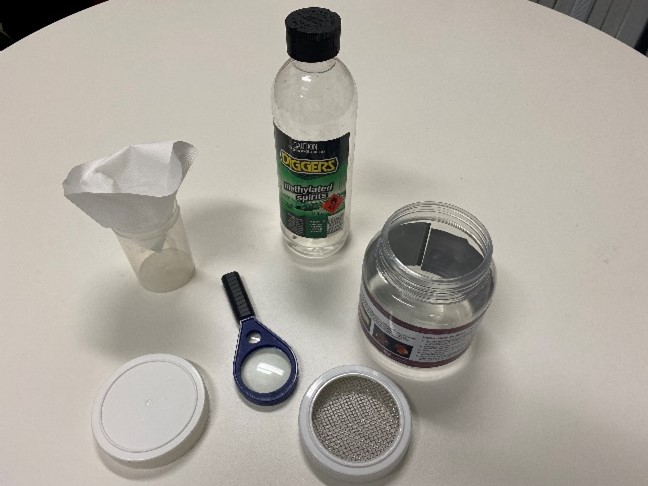
Alcohol wash kit—shake jar, mesh and solid lids, alcohol, filter paper and jar, and magnifying glass Method
- Remove the lid from the shake jar.
- Prepare the shake jar by adding ½ cup (about 125mL) of the chosen solution.
- Open the hive and carefully remove supers and the queen excluder to expose the brood box.
- Select 1 or 2 of the middle 3 frames of the hive brood cluster where the nurse bees are keeping the capped and uncapped brood warm. These are most likely to carry varroa mite.
- Shake the bees from the frames into a tub. Collect ½ cup of bees (about 300 bees) and place them in the shake jar. Do not put the queen bee in the shake jar.
- Place the solid lid on the jar, seal it and shake it vigorously for at least 15 seconds.
- Place the filter paper or cloth into the funnel (see image above). Place the funnel into the container for collecting used alcohol.
- Remove the solid lid and replace it with the mesh lid.
- Carefully pour the alcohol through the filter paper or cloth and into the container. The bees should remain in the jar, while any mites present will remain in the alcohol and be poured onto the filter.
- Check the filter paper or cloth for the presence of mites. Use a magnifying glass if needed.
- Place either the filtered alcohol or fresh alcohol in the jar, then repeat steps 6–10 a further 2 times. Repeat washes increase the chance of finding a mite. You can reuse the solution over 2–3 hives until it discolours too much.
- If suspect mites are present, take a photo—see how to best photograph your sample.
- Carefully place any filter paper or cloths with suspect mites in a sealable plastic bag or other container, seal it and keep it in the freezer.
- Complete the Bee 123 form and attach a photograph. If you're having trouble accessing the form, email varroa@dpi.qld.gov.au.
- Discard the dead bees from the shake jar away from the hive.
Sample in sealable plastic bag For more information about alcohol washing, visit the Plant Health Australia website.
-
This is an effective method of detecting mites in your hive. However, it will not detect varroa mite in capped brood cells.
Watch our short video on how to check hives using an alcohol wash.
Tips
- This test kills the bees sampled, so first find and exclude the queen bee.
- Using filter paper or cloth to strain the liquid allows mites to be easily detected as they will remain on the paper or cloth.
- If the sample does not contain mites, you can reuse the alcohol to test other hives.
- Alcohol is a potential fire hazard, so always keep it away from the smoker.
Materials
- PPE (protective clothing, smoker and hive tool)
- A shake jar with a removable internal basket—see image below
- Alcohol: either pure methylated spirits (preferably clear) or more than 70% concentrated ethanol
- A tub to shake bees into for collection
- A container for collecting used alcohol
- A magnifying glass (optional)
- A filter (such as a coffee filter or fine cloth)
- A small funnel to support the filter paper or cloth
- A container for collecting the strained liquid
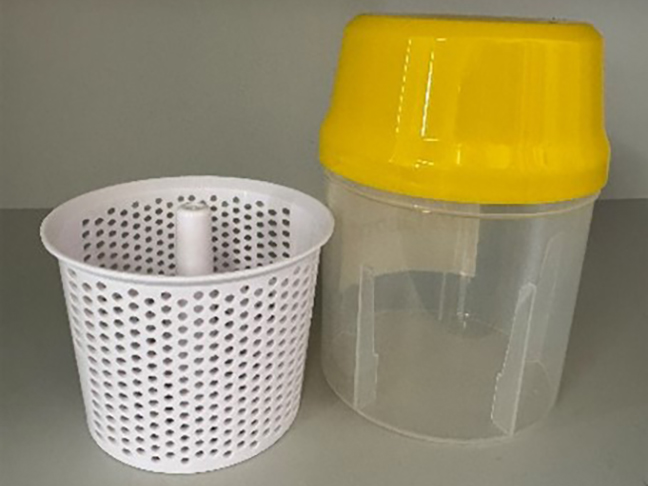
Shake jar with removable internal basket (image courtesy of the National Varroa Mite Management Program) Method
- Remove the lid from the shake jar.
- Prepare the shake jar by adding ½ cup (about 125mL) of the chosen solution.
- Open the hive and carefully remove supers and the queen excluder to expose the brood box.
- Select 1 or 2 of the middle 3 frames of the hive brood cluster where the nurse bees are keeping the capped and uncapped brood warm. These are most likely to carry varroa mite.
- Shake the bees from the frames into a tub. Collect ½ cup of bees (about 300 bees) and place them in the shake jar. Do not put the queen bee in the shake jar.
- Place the solid lid on the jar, seal it and shake it vigorously for at least 15 seconds.
- Place the filter paper or cloth into the funnel. Place the funnel into the container for collecting used alcohol.
- Open the jar and remove the internal basket. Check for mites in the alcohol at the bottom of the jar.
- Carefully pour the alcohol through the filter paper or cloth and into the container. Any mites present will be poured onto the filter.
- Check the filter paper or cloth for the presence of mites. Use a magnifying glass if needed.
- Place either the filtered alcohol or fresh alcohol in the jar, then return the internal basket and repeat steps 6–10 a further 2 times. Repeat washes increase the chance of finding a mite. You can reuse the solution over 2–3 hives until it discolours too much.
- If suspect mites are present, take a photo—see how to best photograph your sample.
- Carefully place any filter paper or cloths with suspect mites in a sealable plastic bag or other container, seal it and keep it in the freezer.
- Complete the Bee 123 form and attach a photograph. If you're having trouble accessing the form, email varroa@dpi.qld.gov.au.
- Discard the dead bees from the shake jar away from the hive.
Sample in sealable plastic bag For more information about alcohol washing, visit the Plant Health Australia website.
-
Drone brood uncapping is used to detect varroa mite on bee larvae.
This method:
- requires less equipment and handling than other methods
- can detect mites on pupae easily
- kills the drone brood sampled.
Watch this video about drone uncapping.
Tip
- Complete a mite check with either alcohol wash or sugar shake as well as drone uncapping if there is drone brood present.
Materials
- Comb scratcher
- Sheet of white paper or card (A4 or A3 is ideal)
- Magnifying glass (optional)
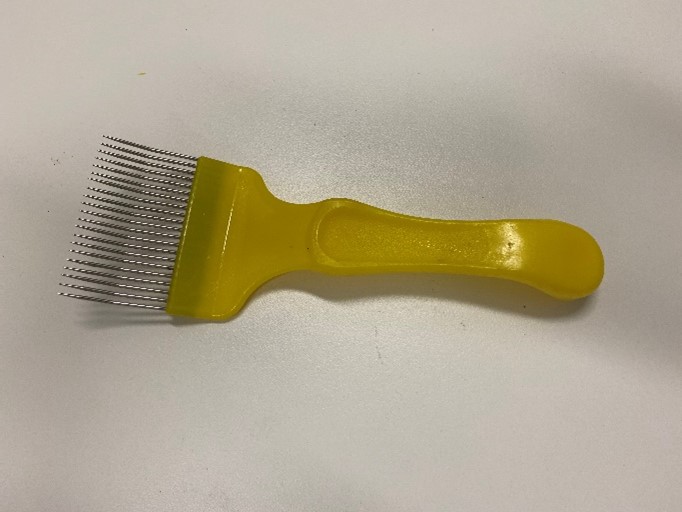
Comb scratcher Method
- Choose at least 3 brood frames from randomly selected hives in an apiary. Uncap about 100 drone brood cells per sample.
- Push the comb (fingers) of the scratcher through a patch of capped drone brood and pull a large patch of pupae out all at once (see image below). Be careful to avoid the queen. This will kill the drone brood sampled.
- Examine each pupa for reddish-brown mites. Use a magnifying glass if needed.
- Mites are easier to see on younger pupae with pink eyes than on pupae that have taken on adult colouration. However, pupae younger than the pink-eyed stage are often too soft and fall apart when the scratcher is pulled out.
- After removing the drone pupae, check the bottom of the drone brood cells for any mites that may not have been attached to the removed pupae. Use a magnifying glass if needed.
- Tap the comb over a piece of white paper or card. Mites that do not come out with the pupae may fall onto the paper or card. You can also place the paper or card in a tray.
- If suspect mites are present, take a photo—see how to best photograph your sample.
- Place any suspect mites (including any filter paper or cloths with suspect mites) in a sealable plastic bag or container and store it in the freezer.
- Complete the Bee 123 form and attach a photograph. If you're having trouble accessing the form, email varroa@dpi.qld.gov.au.
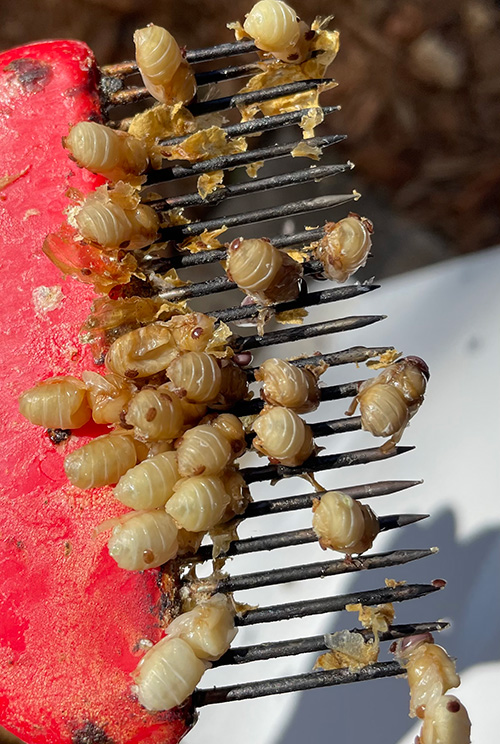
Numerous mites on a comb scratcher (image courtesy of the National Varroa Mite Management Program) -
Sugar shaking was once thought not to kill the bees sampled; however, it causes death to part of the bee population over a longer period. This is due to the icing sugar blocking the bees' respiratory organs (the spiracles), which causes them to suffocate over a few days.
This method:
- is considered less efficient than alcohol wash in detecting mites
- takes longer and requires more handling than other methods
- will not detect varroa mite in capped brood cells
- should not be conducted during honey flows.
Watch this video about how to do a sugar shake.
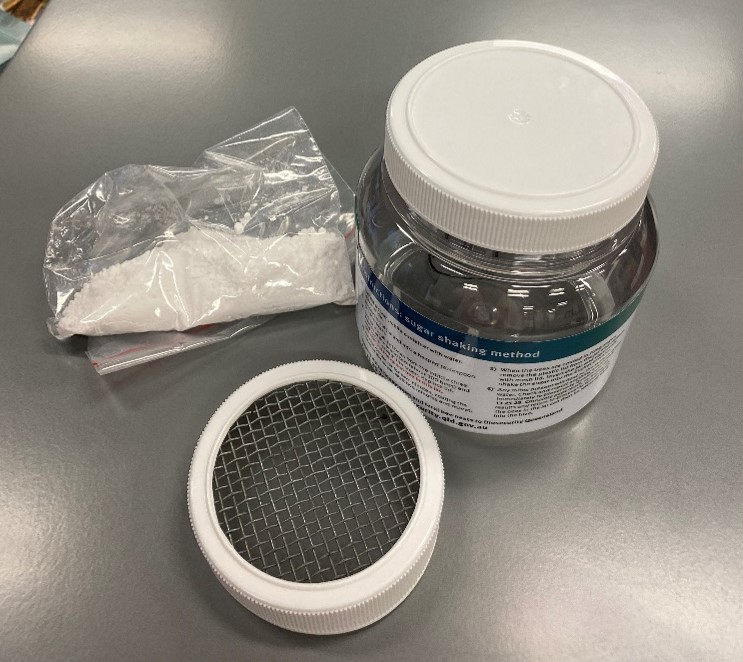
Materials
- A shake jar with a mesh (or drilled-hole) lid and a solid lid
- Pure icing sugar or icing mixture
- A small bucket (500mL–1L in size), preferably white or clear, partially filled with clean water
- Clean cotton buds
- A strainer (optional)
- A magnifying glass (optional)
Sugar shake kit—shake jar, mesh and solid lids, strainer (optional), small bucket, pure icing sugar and magnifying glass Method
- Partly fill the small bucket with clean water. Leave it aside.
- Place a heaped tablespoon of icing sugar into the shake jar through the mesh lid or strainer (to break up clumps).
- Add ½ cup of nurse bees (about 300 bees) collected from the middle 3 frames of the brood box to the shake jar and seal the jar using the solid lid. Do not put the queen bee in the shake jar.
- Gently roll the jar in your hands for about 2 minutes, coating the bees in the sugar. Wait 2 minutes and then repeat. Allow it to rest for 1 minute.
- Quickly remove the solid lid and replace it with the mesh (or drilled-hole) lid. Turn the jar upside-down over the bucket of water and vigorously shake the sugar into the bucket of water for 1 minute.
- Add another heaped tablespoon of icing sugar into the shake jar and repeat steps 4 and 5.
- Any mites (if present) will be dislodged by the icing sugar into the bucket and will float on the surface of the water. Stirring the water will help dissolve the sugar and this will make it easier to check for and count mites.
- Remove any suspect mites with a cotton bud for closer inspection. Use a magnifying glass if needed.
- If suspect mites are present, take a photo—see how to best photograph your sample.
- Place any cotton buds with suspect mites in a sealable plastic bag or container and store it in the freezer.
- Complete the Bee 123 form and attach a photograph. If you're having trouble accessing the form, email varroa@dpi.qld.gov.au.
- Release the bees in the shake jar back into the hive.
-
Sticky mats are used to determine the presence or absence of varroa mite. They are not used to determine mite threshold levels.
This method is not a quick check. A second visit is required 3–5 days later to remove the mat or corflute. If left for longer than this, the mat or corflute can become covered in hive debris, making it difficult to detect mites.
Sticky mats made using corflute and vegetable oil can be washed and reused.
This method is effective in detecting varroa mite because 20% of the pests naturally fall from newly emerged adults. However, it will not detect mites in capped brood cells and its accuracy is affected by brood presence and amount.
Materials
- PPE (protective clothing, smoker and hive tool)
- Sticky mat or corflute sprayed with vegetable oil
- Mesh bottom board or mesh screen (5mm) to go over the sticky mat (deters the bees from chewing the mat and removing the mites)
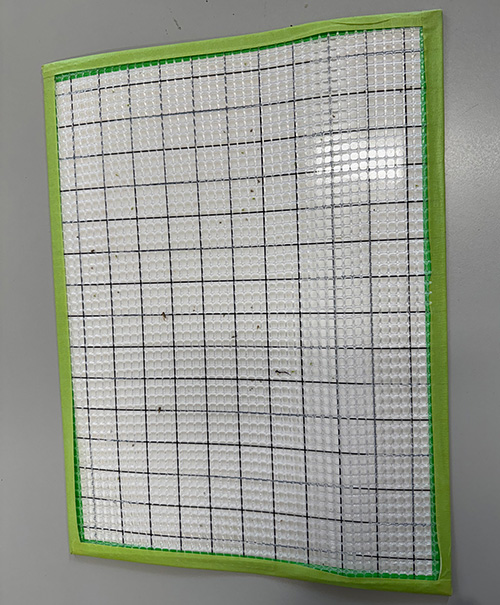
Sticky mat with plastic mesh on top (image courtesy of the National Varroa Mite Management Program) Method
- Place the mesh screen on top of the sticky side of the sticky mat (skip if using mesh on corflute).
- Insert the mat or corflute on the mesh/solid bottom board of the hive.
- Leave it for 3–5 days.
- Remove the mat or corflute and check for mites.
- If mites are present, take a photo of the suspect mites—see how to best photograph your sample.
- Place the mat/corflute in a sealable plastic bag or container and store it in the freezer.
- Complete the Bee 123 form and attach a photograph. If you're having trouble accessing the form, email varroa@dpi.qld.gov.au.

Sticky mat with multiple varroa mites (image courtesy of the National Varroa Mite Management Program)
-
A soapy water wash is an effective method of detecting mites in your hive. However, it will not detect varroa mite in capped brood cells.
Tips
- This test kills the bees sampled, so first find and exclude the queen bee.
- Using filter paper or cloth to strain the liquid allows mites to be easily detected as they will remain on the paper or cloth.
- Use a low-suds dishwashing liquid, laundry liquid or windscreen-wiper fluid.
- If you do not filter the liquid, allow extra time for the mites to sink to the bottom so they are visible.
- If the sample does not contain mites, you can reuse the soapy water to test other hives.
Materials
- PPE (protective clothing, smoker and hive tool
- A shake jar with a removable internal basket—see image below
- Soapy water: 1 teaspoon of low-suds dishwashing liquid, laundry liquid or windscreen-wiper fluid per litre of water
- A tub to shake bees into for collection
- A half-cup measure
- A filter (such as a coffee filter or fine cloth)
- A small funnel to support the filter paper or cloth
- A container for collecting the strained soapy water
- A magnifying glass (optional)
Shake jar with removable internal basket (image courtesy of the National Varroa Mite Management Program) Method
- Remove the lid from the shake jar.
- Prepare the shake jar by adding 150mL of soapy water.
- Open the hive and carefully remove supers and the queen excluder to expose the brood box.
- Select 1 or 2 of the middle 3 frames of the hive brood cluster where the nurse bees are keeping the capped and uncapped brood warm. These are most likely to carry varroa mite.
- Shake the bees from the frames into a tub. Collect ½ cup of bees (about 300 bees) and place them in the shake jar. Do not put the queen bee in the shake jar.
- Place the solid lid on the jar, seal it and shake or swirl the jar vigorously for at least 15 seconds.
- Place the filter paper or cloth into the funnel. Place the funnel into the container for collecting used soapy water.
- Open the jar and remove the internal basket. Check for mites in the soapy water at the bottom of the jar.
- Carefully pour the soapy water through the filter paper or cloth and into the container. Any mites present will be poured onto the filter. Wait until the bubbles disappear so that you can see any mites clearly.
- Check the filter paper or cloth for the presence of mites. Use a magnifying glass if needed.
- Place either the filtered soapy water or fresh soapy water in the jar, then return the internal basket and lid repeat steps 6–10 a further 2 times. Repeat washes increases the chance of finding a mite.
- If suspect mites are present, take a photo—see how to best photograph your sample.
- Carefully place any filter paper or cloths with suspect mites in a sealable plastic bag or other container, seal it and keep it in the freezer.
- Complete the Bee 123 form and attach a photograph. If you're having trouble accessing the form, email varroa@dpi.qld.gov.au.
- Discard the dead bees from the shake jar away from the hive.
How to make a mesh or drilled-hole shake jar
Follow these instructions to make a shake jar for the alcohol wash and sugar shake methods.
- Use a container with an opening of at least 100mm in diameter and a height of at least 100mm (to ensure the sampled bees can move freely enough to dislodge mites).
- Use a solid lid that fits the container.
- Also have a lid that has a large hole covered with mesh.
- The mesh holes should be 3–4mm square to exclude bees but allow mites to pass through.
- The mesh can be glued or fixed to the inside of the lid, as long as it cannot come loose during the procedure.
- An alternative to a mesh lid is a solid lid with holes 3–4mm in diameter drilled into it.
More information
- Read more about how to report suspected varroa mite.